The Mac screenshot guide is your complete companion for capturing, editing, and sharing anything on your screen with ease. Whether you are a student, professional, or content creator, knowing the right macOS screenshot shortcuts can save time and improve productivity. From quick full-screen captures to advanced tools like the Screenshot Utility, macOS offers powerful features for every need. This guide will also help you master screen recording on Mac and learn how to edit screenshots on Mac without using extra software. With simple steps and practical tips, you will gain confidence in using built-in tools to create clear visuals, tutorials, and presentations in 2025.
General
Mac Screenshot Guide: All Shortcuts + Pro Tips (Updated 2026)
Microespanatools Blog
February 13, 2026
How to Screenshot on a MacBook?
Learning how to screenshot on a MacBook starts with understanding your keyboard. Apple builds powerful tools directly into macOS. You don’t need extra apps to capture the screen on a Mac. With a few shortcut keys, you can save images, copy a screenshot to the clipboard, or start recordings in seconds.
Most users rely on Mac shortcut keys for screenshots because they work instantly. When you practice them daily, they become automatic. This makes you faster at work and more confident. Over time, you will develop your own routine for saving screenshots automatically and sharing them.
Understanding the Basics of macOS Screenshots
The macOS screenshot shortcuts system saves files in smart ways. By default, screenshots appear on the desktop. The system assigns names and timestamps. This helps you understand where to save screenshots on Mac without searching.
Screenshots are usually saved in PNG format. You can later change the screenshot format to JPG or PDF. You can also decide the screenshot storage location through system settings. These small changes help you organise the screenshots folder and reduce clutter.
Default Screenshot Facts
| Feature | Details |
| Default Format | PNG |
| Default Location | Desktop |
| Clipboard Option | Available |
| File Naming | Date and Time |
| Editable | Yes |
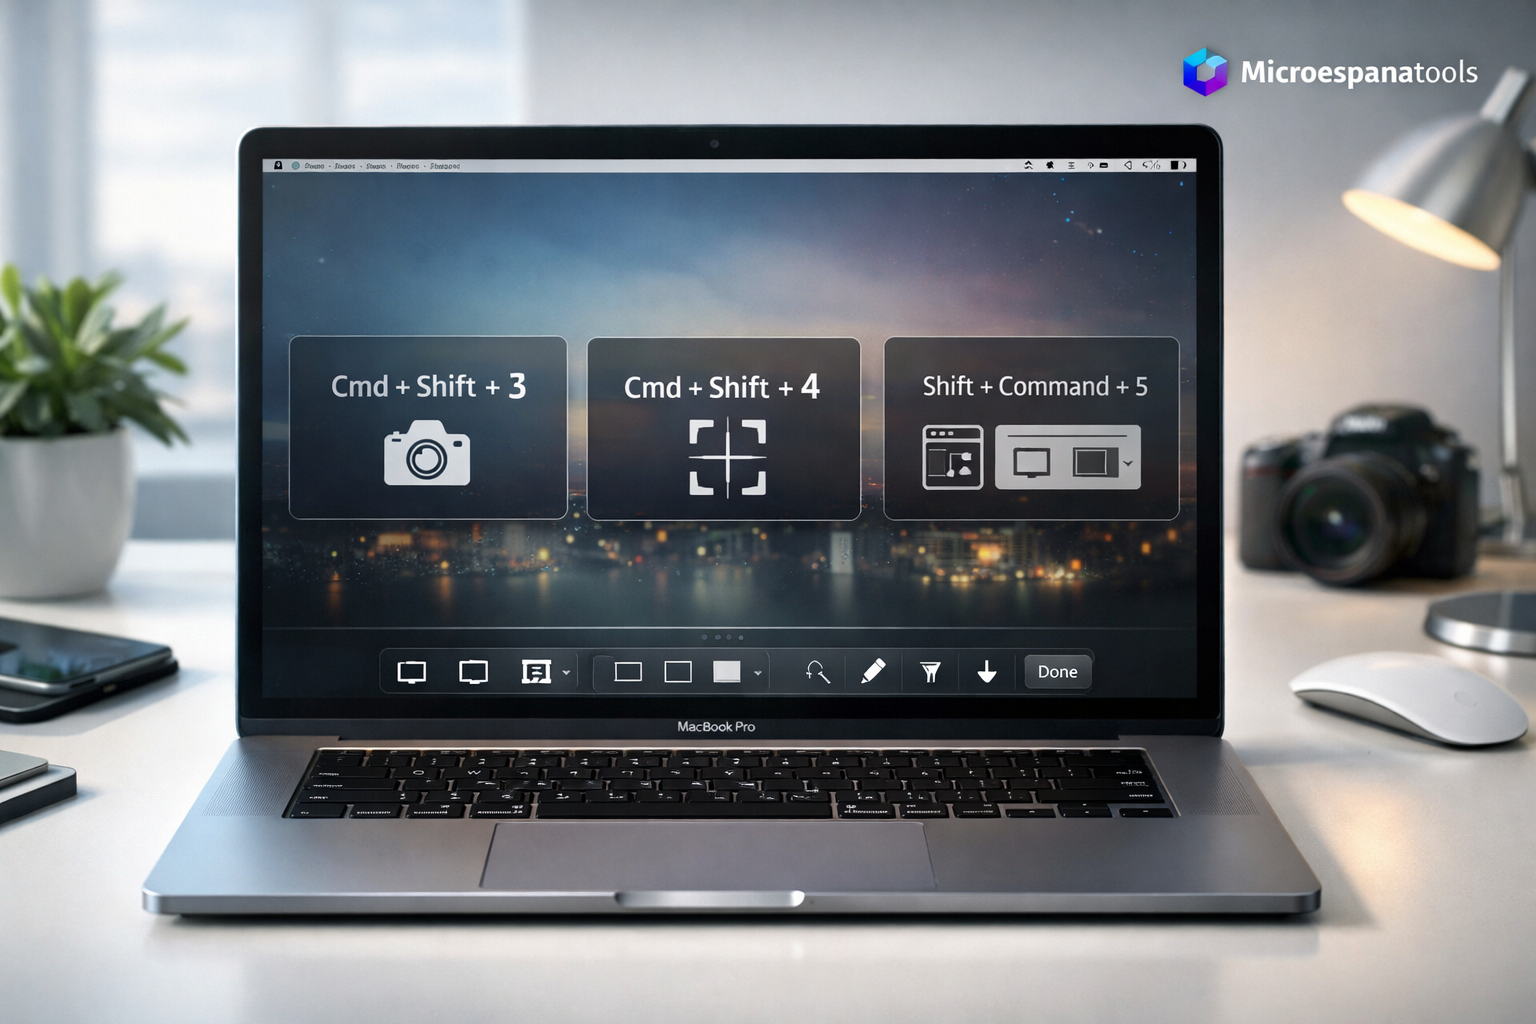
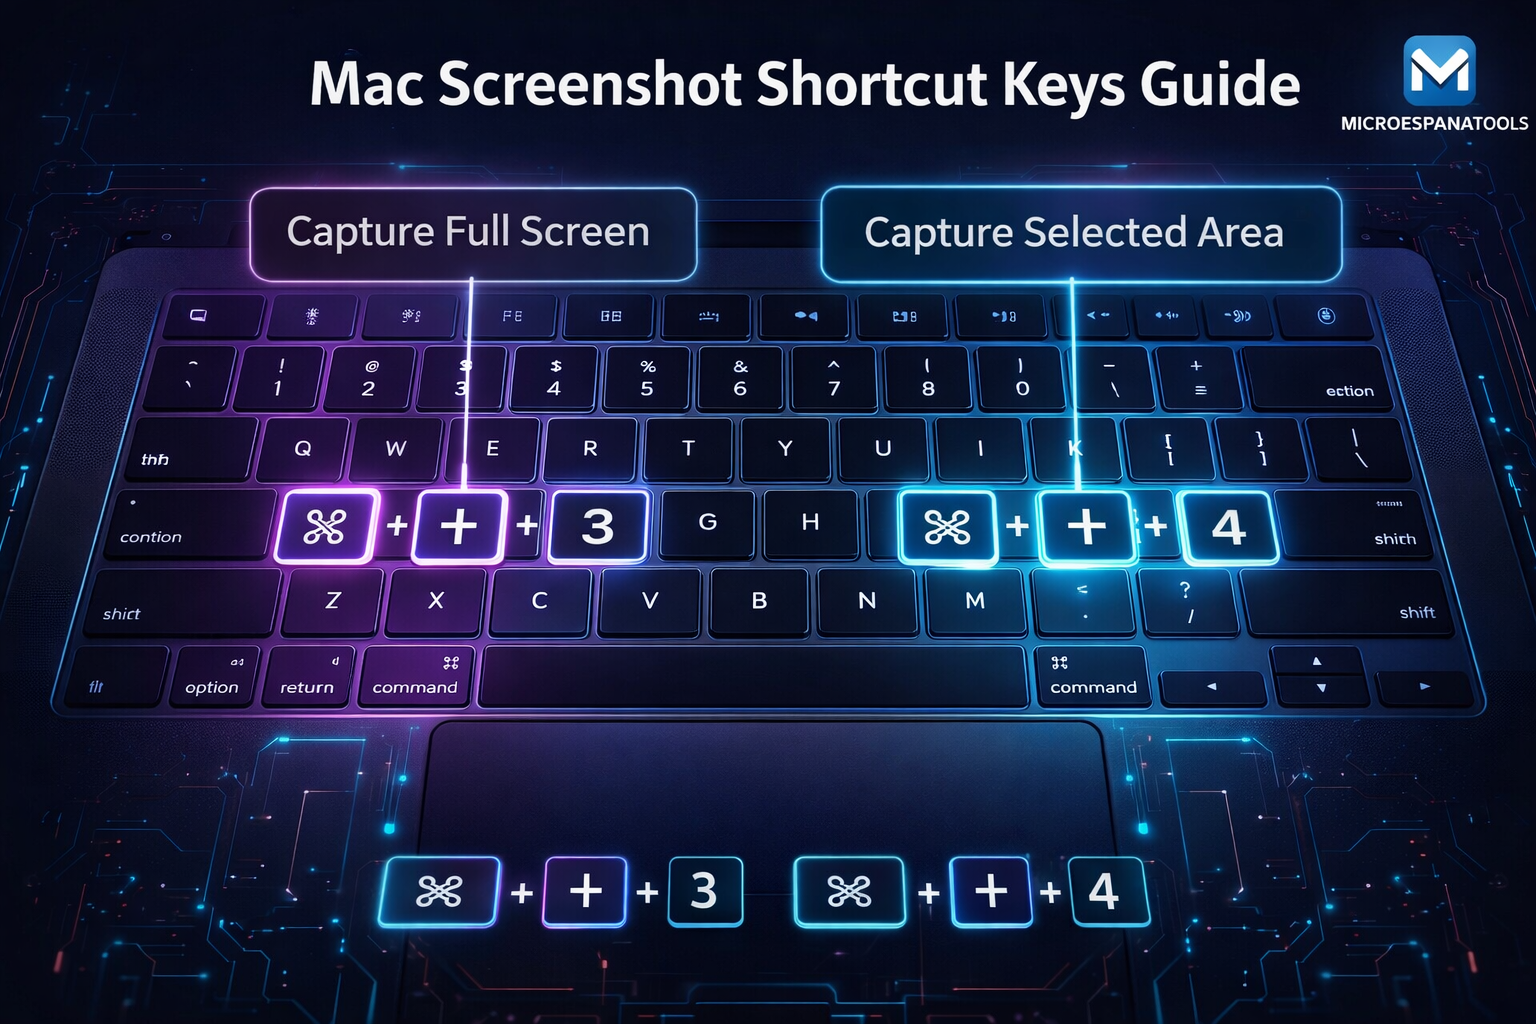
Capture Full Screen on Mac (Cmd + Shift + 3)
The Full screen capture Mac shortcut captures everything visible on your display. Press Command, Shift, and 3 together. In one second, the system saves a complete image. This is useful for presentations, website designs, and error reports.
When you use this shortcut with Control, it sends the image to clipboard. This lets you paste it into emails or chats. This method helps when you need a fast Clipboard screenshot without saving files.

Capturing a Selected Portion of the Screen (Cmd + Shift + 4)
The Selected area screenshot feature gives you control. Press Command, Shift, and 4. Your cursor turns into a crosshair. Drag it to select only what you need. This keeps your images clean and focused.
You can move the selection by holding the spacebar. This is helpful when cropping tight spaces. Designers and teachers prefer this method because it avoids extra editing. It is one of the most practical Mac screen capture tips.
Screenshots of a Single Window or Menu
The Window screenshot Mac shortcut helps you capture only one app window. Press Command, Shift, and 4, then tap the spacebar. Your cursor becomes a camera. Click the window to save it.
This method adds a subtle shadow around the image. It makes screenshots look professional. You can also capture menus and pop-ups. This is useful when creating guides or explaining software steps.
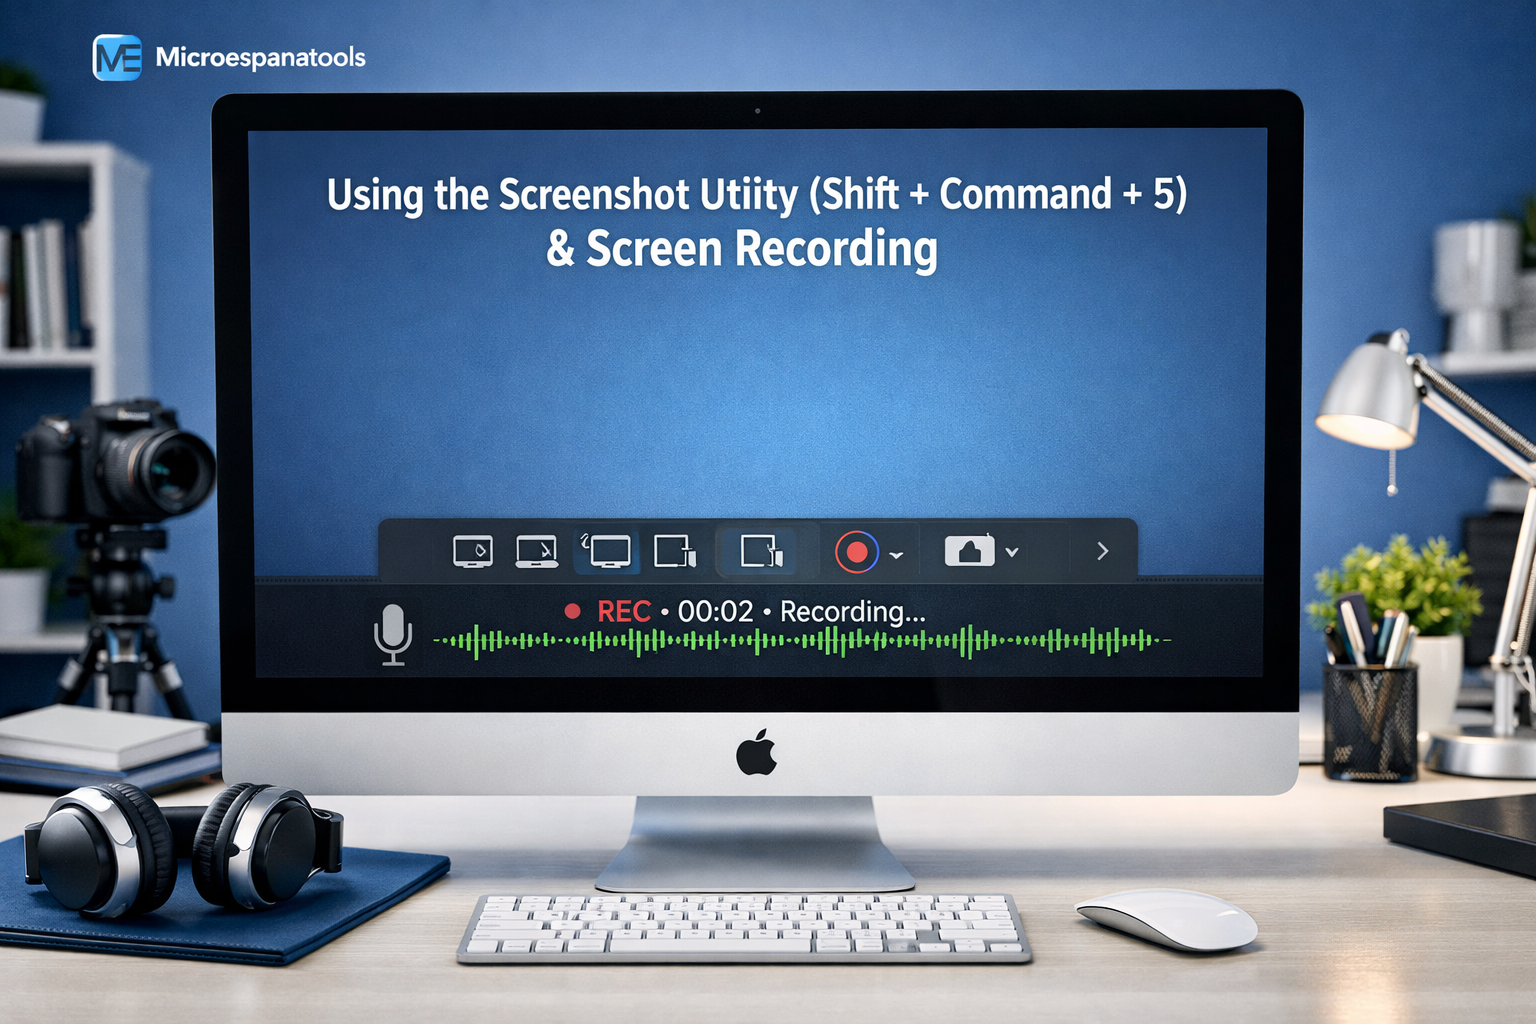
Using the Screenshot Utility (Shift + Command + 5)
The Screenshot Utility tool is a complete control center. Press Shift, Command, and 5 to open it. You will see buttons for images, videos, timers, and settings. This tool works for both screenshots and screen recording on Mac.
You can choose save locations, enable timers, and turn on microphone input. This makes screen recording with audio easy. The toolbar also supports change screenshot settings without using Terminal commands.
Screenshot Utility Options
| Option | Function |
| Capture Screen | Full display image |
| Capture Window | App window |
| Capture Portion | Custom area |
| Record Screen | Video capture |
| Options | Location and Timer |
Bonus for Touch Bar MacBooks: Cmd + Shift + 6
The Touch Bar screenshot shortcut works only on supported MacBooks. Press Command, Shift, and 6. The system captures everything shown on the Touch Bar. This is helpful for tutorials and support guides.
Although Apple reduced Touch Bar models, many users still rely on it. If you own one, this feature adds extra value. It also works with clipboard mode for faster sharing.
Recording Your Screen on Mac
The record screen on the MacBook feature helps you create tutorials and demos. You can record full or partial screens. You can also add voice narration to screen recording using your microphone.
Screen videos save as MOV files. You can trim them instantly in Preview. Many teachers use this feature to explain lessons. It is a powerful part of screen recording on Mac.
How to Edit and Save Screenshots on Mac
To edit screenshots on Mac, click the preview thumbnail after capture. This opens editing tools instantly. You can crop, rotate, and adjust colors. This saves time before sharing.
You can also open files in Preview for advanced work. With Preview app editing, you can resize, export, and convert images. This helps you compress screenshot files for emails and websites.
Editing and Annotating Screenshots
The Markup tools macOS system lets you draw, highlight, and label images. You can annotate images on Mac using arrows, shapes, and text. This is perfect for instructions and feedback.
You can also resize screenshots on Mac and export images from Preview into different formats. These tools help you share screenshots easily with clear explanations.

Advanced Screenshot Tips & Tricks (2025 Edition)
Advanced users prefer to automate screenshot workflow using scripts and shortcuts. You can automate screenshots with Automator and Shortcuts. This helps you automate screenshot workflow for daily tasks.
You can also set custom folders, rename files automatically, and sync them to cloud storage. Many professionals use this method to save screenshots automatically and stay organized.
Automation Benefits
| Benefit | Result |
| Auto Rename | Better sorting |
| Cloud Sync | Backup safety |
| Folder Rules | Easy access |
| Time Saving | Higher productivity |
What Should You Do If Mac Screenshots Aren’t Saving?
When you face Screenshot not saving Mac problems, check storage and permissions first. Low disk space and disabled folders often cause errors. Restarting Finder also fixes many cases.
If shortcuts stop working, reset preferences or update macOS. These steps help fix Mac screenshots not working. Regular system updates keep your tools stable.
Mac Screenshot Guide Pro Workflow Example
A graphic designer used this Mac screenshot guide to build a fast routine. He used shortcuts to capture my Mac screen, edited with Preview, and automated exports. This system helped him finish projects faster and maintain quality using the Mac Screenshot Guide: All Shortcuts + Pro Tips (Updated 2026).
Frequently Asked Questions
Common Questions Table
| Question | Answer |
| Best format? | PNG for quality |
| Can I use clipboard? | Yes |
| Record audio? | Yes |
| Change folder? | Yes |
| Edit later? | Yes |
Conclusion
The Mac Screenshot Guide: All Shortcuts + Pro Tips (Updated 2026) gives you full control over screenshots and recordings. From simple shortcuts to automation, you now know the best way to screenshot on macOS.
By learning How to screenshot on a MacBook, using smart tools, and applying pro tips, you can work faster and smarter. Keep practicing. Soon, capturing and editing screens will feel effortless.